

We hosted our first book swap party and had such a great time that I bet it will become a yearly tradition. As my kids have gotten older, their interest and use of books has changed. When they were babies and toddlers we read the same favorite books over and over until the spine fell to pieces. (Good Night Moon, Barnyard Dance, – you know, the classics!!) Now that my older two are reading chapter books, many of the books still look brand new after reading them. They often only want to read the book once. In addition, I’m recognizing that my kid’s interests are varying greatly so what my oldest enjoys, my other two may not. We are lovers of our local public library and use it often. We also participate in the school book fair and receive books as gifts from family. We just love books at our house so it has resulted in a plethora of books! Summer is quickly approaching and I knew my kids would be desiring a lot of new books to enjoy during our new-found free time. As I contemplated all of the above thoughts, I realized that many of our friends are probably in the same situation and quite possibly have many books that my kiddos would love to read and thus the book swap party was born. With each new event you learn what worked well and areas in which you could improve for the future. So, I’m excited to share with you what worked for us and be sure to read Part 2 to find out what I would recommend you do differently for your book swap party!
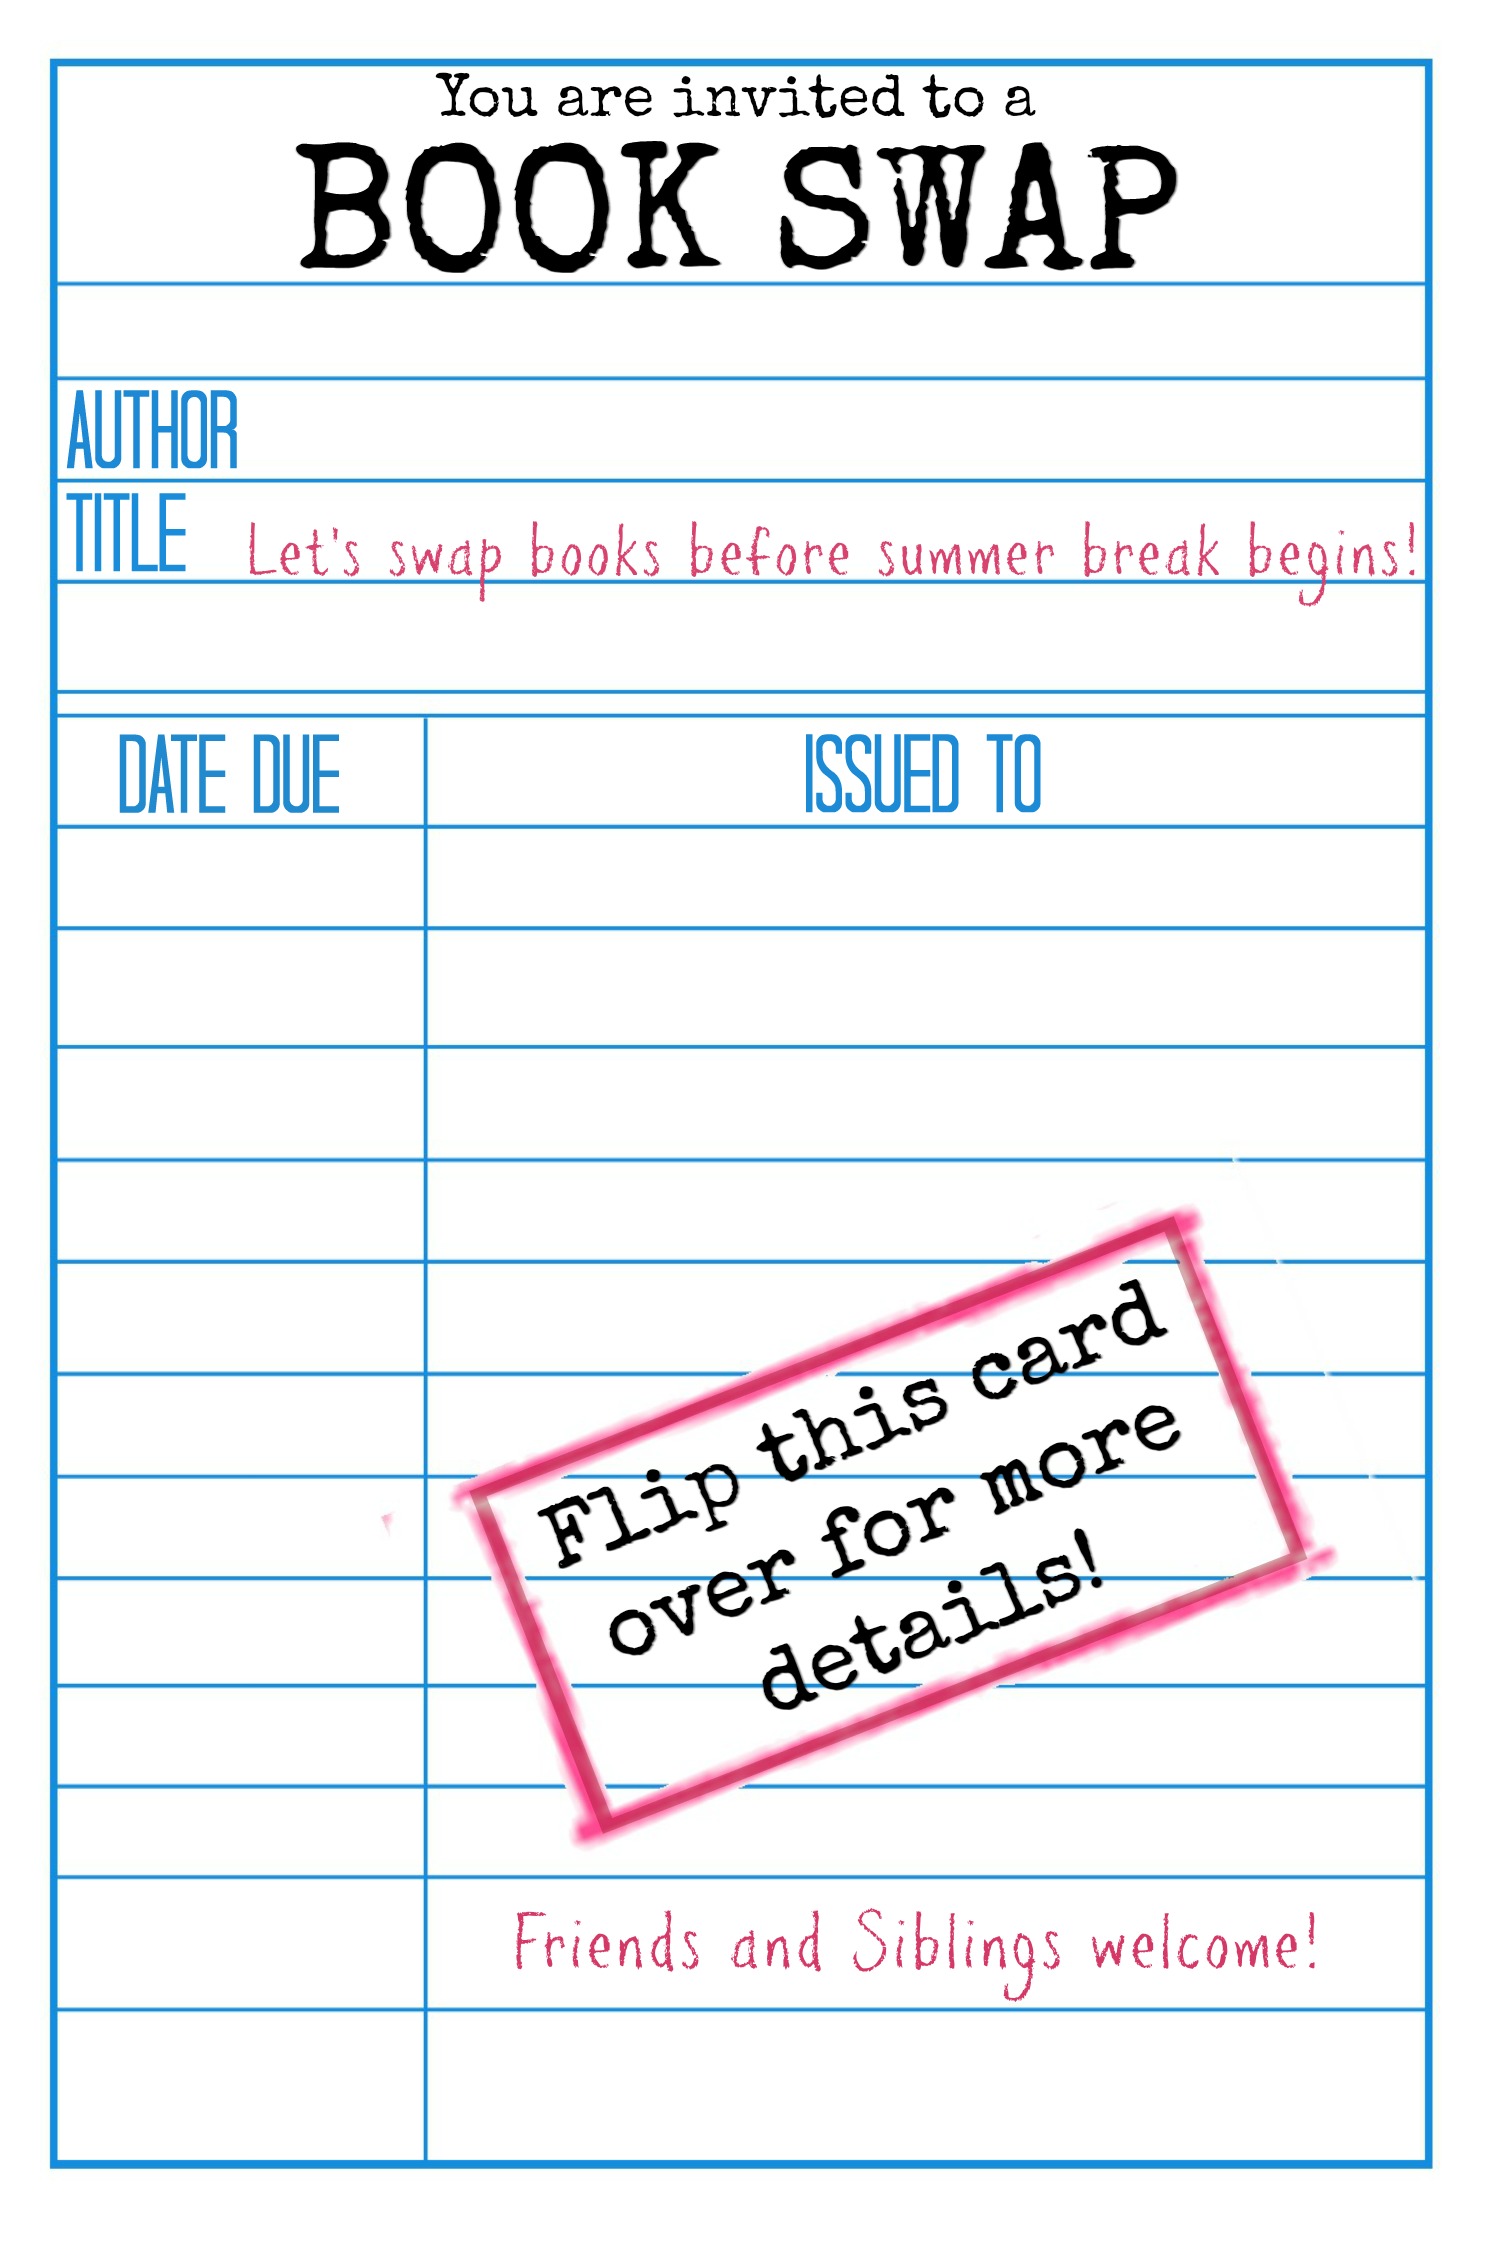
The beginning of any great party is a good invitation. Evites certainly have their place for convenience and timeliness. But, I’m a traditionalist and purist when it comes to parties so if time and energy allows, I always opt for a good old-fashioned paper invitation. When mailboxes are full of advertisements and bills, a whimsical invitation for fun with friends is always a treat to receive! Here is a copy of our book swap invite.


Want the free download of a blank invitation that you can customize for your book swap? Click here for the front of the invite PDF! Click here for the front of the invite for a JPEG! The Back PDF and JPEG. You can open the image in Picmonkey.com to add text boxes, etc. I used Picmonkey.com for creating these and used Special Elite font and PencilPete font. I used cream-colored card stock to create the sleeve for the invitation. I folded it around the invitation to size it correctly and hot glued it in place.
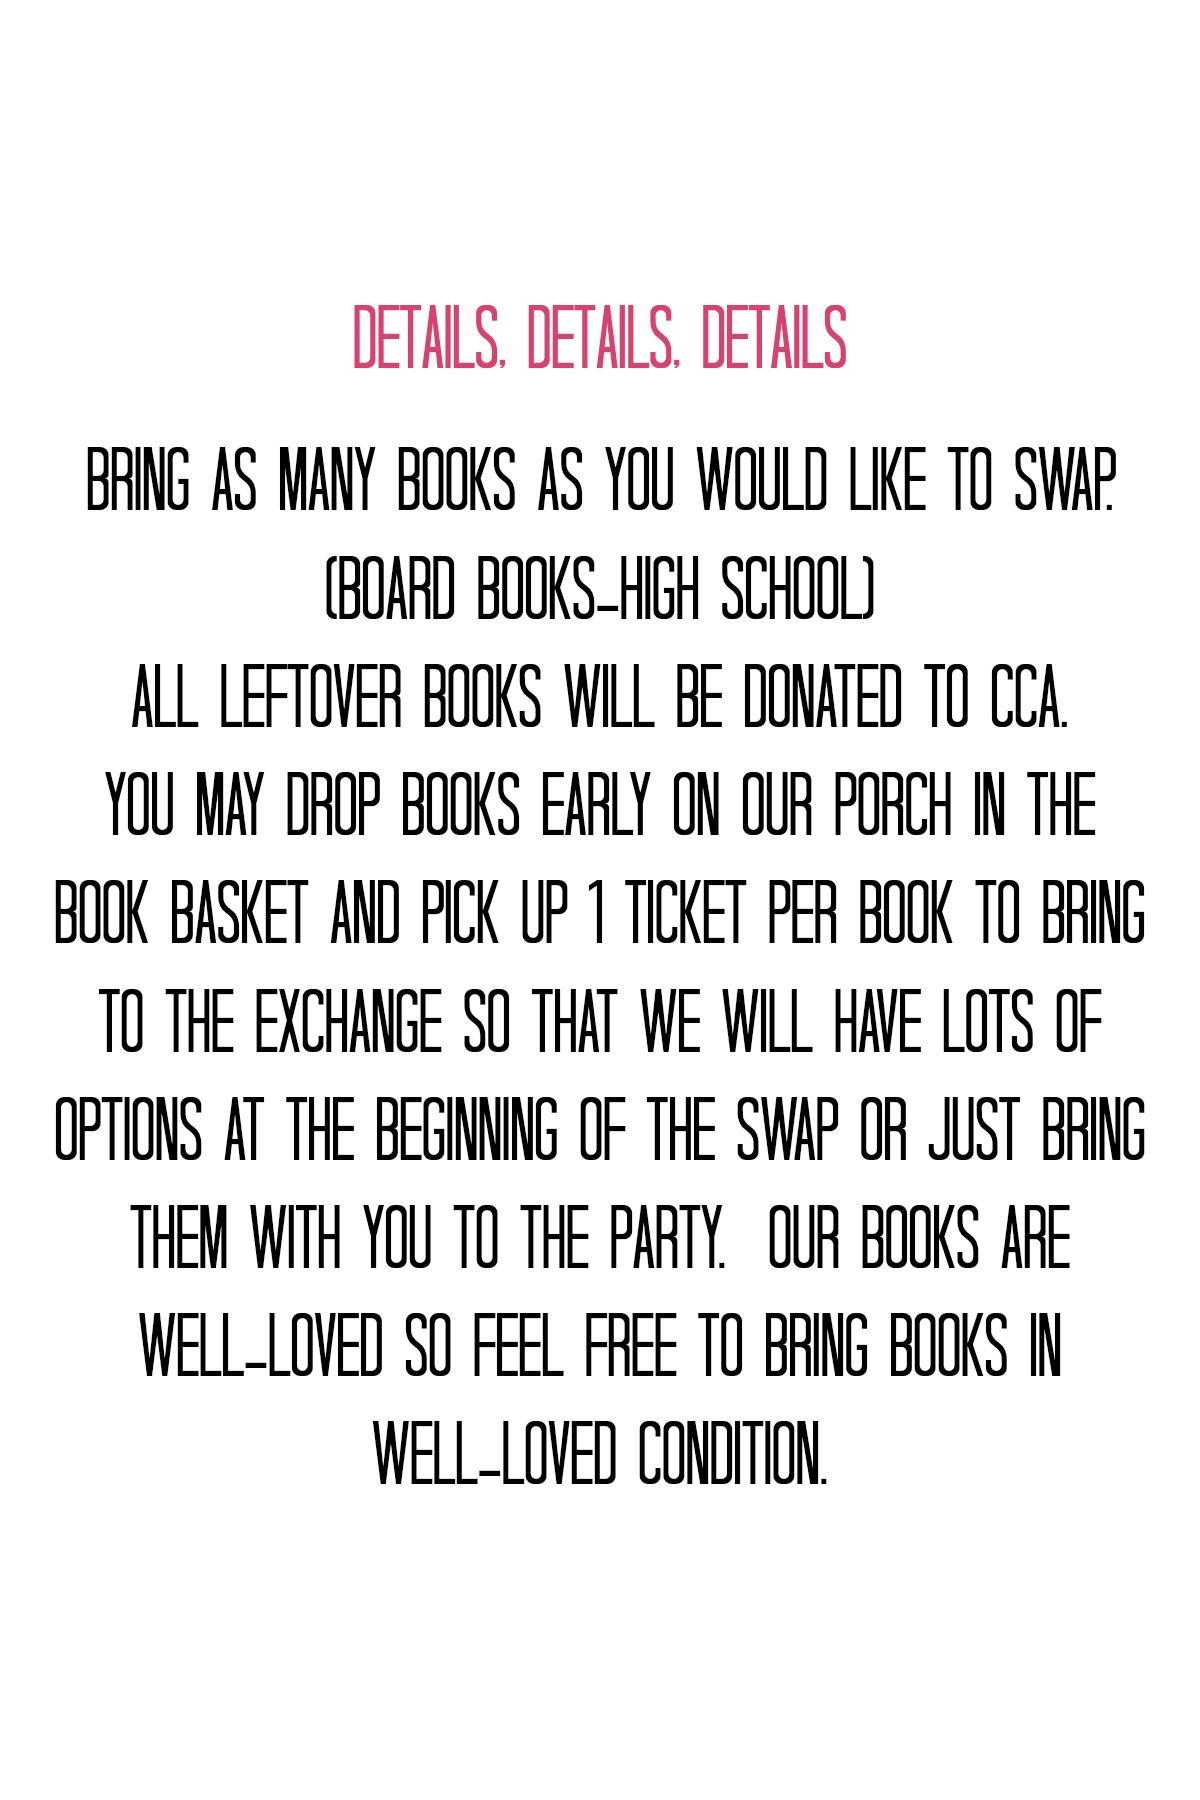
I like to send out party invitations 2-3 weeks in advance. Any earlier, I find that people forget and misplace their invitations. If you send them any later, those planners out there have probably already booked all of their events and will not have margin to participate. For this particular event, it is helpful to give some good lead time so that you have an opportunity to collect books in advance.
Now, once the invitations have been delivered it is time to collect books and decorate! We placed a wicker basket just inside our front porch for a couple of weeks so that friends and neighbors could pop by at their leisure and drop books in the basket and pick up 1 ticket per book. The day of the party we placed this adorable box that the Pure One (my oldest) created and placed it prominently up front for our guests to use before and during the party. We had many families that stopped by the morning of the party and dropped off loads of books. It was the Pure One’s job and her friends to check the basket often and then place the books in their appropriate spots inside.

The morning of the party we placed two antique book paper lanterns out front to welcome our guests. They are a fun alternative to balloons. They are easy to spot from the street so that friends that have never been to our house can easily see that this is the place to party. They are unique and were free because I had all of the supplies on hand. To make them I just used an old paper lantern that I had used at a previous party- you know the ones that have wholes in them and really should just be retired. I placed it on a plastic bowl on top of some newspaper to protect my kitchen table and then began covering it with pieces of antique book paper soaked in watered down Modge Podge. I found that painting on the thick Modge Podge just took too long and the paper didn’t wrap easily around the curves of the lantern, so soaking it in a watered down solution (2/3 water – 1/3 Modge Podge) worked much better. I used a sponge brush to make sure all of the papers stuck together nicely around the lantern. Then I hung them from some twine on my back porch to dry for a couple of hours. I made a paper bow out of two pieces of antique book paper and them punched a circle of black paper and a scalloped circle of antique book paper to add some character to the bow.


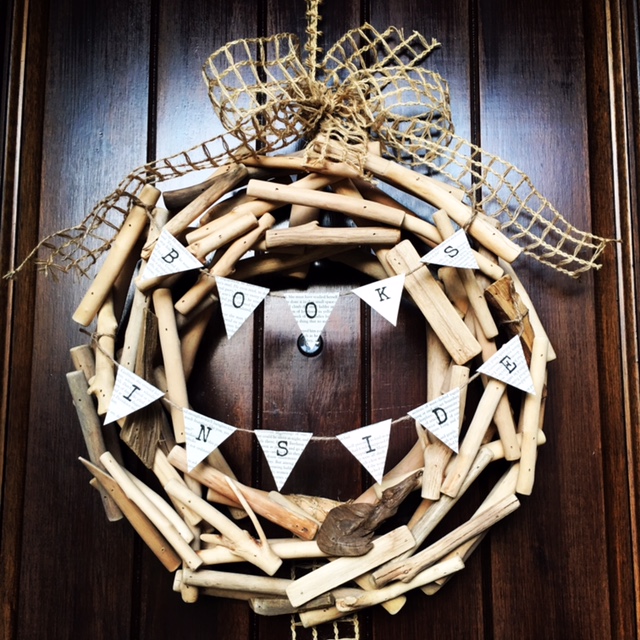
I created the “Books Inside” Pennant to spice up my summer wreath. Really all of the decor you see from here forward is my lazy way of creating some party decor without having to completely re-do my decor. I already had my summer shells, sand, and other decor out so I just added to it. It worked because it is a neutral base to showcase any other decor. It is a good reminder that you do not have to completely re-create all of the decor in your home for a party to be well decorated. You can just layer a bit of the theme on top of any neutral decor you already have in place. It saves time and money!
I created a template with a triangle and a text box centered for the letters. You can download a Google Drive Copy HERE! I just printed one template on a white sheet of card stock and then used my favorite blue painter’s tape to center the antique book paper on top. Then I placed it in the printer and printed the same letters. I changed the letter, placed a blank sheet of antique book paper, and then repeated the process until I had all of the letters. You could spell any other greetings using the same method. The template has a small rectangle on top to guide a fold that I used to hug the twine. After cutting the small flags, I placed a small bit of double stick tape on the fold to help the paper to adhere to the twine. It worked like a charm and stayed put for a week!

Once inside, I often decorate my entry chandelier with lanterns or other decor to enhance the experience. It just says fun to me! I used floral wire to wrap around Shel Silverstein’s Falling Up!- He is one of my favorite children’s authors. Such great, whimsical poetry! It seemed like a perfect choice to look up to see upon arrival to the book swap. I cut out birds from the antique book paper and hung them from fishing line to create imagery that suggested that the “words were flying off the page.” I make small hooks out of floral wire and tie and/or hot glue them to the fishing line. I use a grabber and a ladder to hang them on the chandelier.

Next, I just added a little book decor here and there to my current summer display on our entry table. It is amazing how quickly decor can change by just added some consistent touches around.


I used craft wrapping paper to wrap some books and added a bit of left over burlap I had to create some rustic risers.


I printed some little copies of book covers onto white card stock and cute them out and placed them on some cotton branches. It is an easy way to display many of the classic children’s books that bring us all wonderful memories.

I had the Pure One and her friends organize the books according to type/genre all over the downstairs. We used tables, counter tops, the staircase, floors, etc. We made sure that books were easy to see and pick up according to the age level. For example, we put the chapter books on the staircase so that the older kids could climb up and down the stairs more safely than the toddlers would. Once each guest arrived, the little librarians would accept their books and give them a ticket per book. They would then go place the books in the appropriate section.


The guests would come and go throughout the party and shop at their leisure. Before they left, they placed a ticket per book they took home in a bowl by the front door. The kids seem to love the tickets. Every kiddos loves using money and shopping. This created a sense of independence and responsibility for the little ones. It created an easy, organized process for the book exchange. It allowed me to not have to “manage” any part of the party and focus on what really matters in every party – connecting with the hearts of our guests!

We provided a large vat of citrus water and some literary cookies and book worms for a snack. The food decor was inspiring and fun, yet simple. It kept the prep work to a minimum for me and created a low-key environment for our guests.

I created very simple mini books from one antique book I purchased at the antique store for $4. Yes! – all of the decor you see in this post came from 1 medium-sized old book! I layered four or five book pages and then cut them into strips with a strip of wax paper on the back. I made the wax paper a little wider that the book as I wanted to make sure the only thing that touched the cookie was the new, clean wax paper. (I’m have pretty high standards for food cleanliness! This drives my hubby crazy because I’m one of those that will not participate in the 5 second rule and eat off the floor ;)) I sewed them to create a spine and then cut them into mini books.


My little librarians panted a thick, simple syrup mixture (you could use corn syrup, but for some reason I feel like I’m breaking some food law if I purchase corn syrup. I’m just certain the food police would arrest me for trying to consume fake food!) on the back of the wax paper and placed them on the cookies. This allowed them to stick to the icing. The sugar cookies are my old stand by recipe. They are the perfect, classic sugar cookie. I always receive compliments and recipe requests-check back, I will share the recipe soon! I also used my homemade royal icing recipe.

The finished product! Simple, white iced sugar cookies surrounding great books!


I placed a sheet of wax paper on top of any books to continue the clean display 🙂

Here is the snack spread! We served Literary Cookies, Book Worms, and Language Lollypops! Super simple, but big impact! The snacks encouraged people to stand around and visit for a while and those that need to go loved packing themselves a bag of goodies to take on the road.


I continued the easy antique book theme on my large lace trimmed metal cake pedestal. I sewed a few strips of antique book paper together and then tied a large twine bow with some black tissue paper tassels that I used at the Strong Tower’s Barbie Spy party. It pays to store the neutral party decor items- I use them over and over!

Want more??? Be Sure to CLICK HERE to see the Book Swap Part 2! You won’t want to miss reading about the lessons I learned that you will want to employ at your Book Swap party!

Meet the Hostess

I'm a Southern girl who loves a good party, a house full of laughter, and a porch swing full of friends and family. I blog about how to host in a way that matters. Curious what I mean by that? CLICK HERE TO LEARN MORE AND READ MY STORY.

![]()


Leave a Reply